
TL;DR
Moving your rig out of the room is the most effective way to cut noise. When you must keep it in a closet, focus on strategic placement, sealing gaps, and proper acoustic treatment to get the best results. Foam alone won’t soundproof — but smart setup can turn even a tiny closet into a dead, quiet space.
Ever wonder why some closet studios sound surprisingly good, while others just echo embarrassingly? The secret isn’t just throwing foam on the walls. It’s about where you put sound-absorbing materials, how you seal gaps, and whether you keep the rig in a place that minimizes noise reach. Moving your setup into another room might be the best fix, but if that’s not possible, clever placement and treatment can make your closet a surprisingly effective vocal booth or AI rig space.
This guide cuts through the noise — literally — and shows you how to get the most out of even a tiny closet. You’ll learn how to prioritize placement, treat surfaces effectively, and avoid common pitfalls that turn a small space into a sound mess.
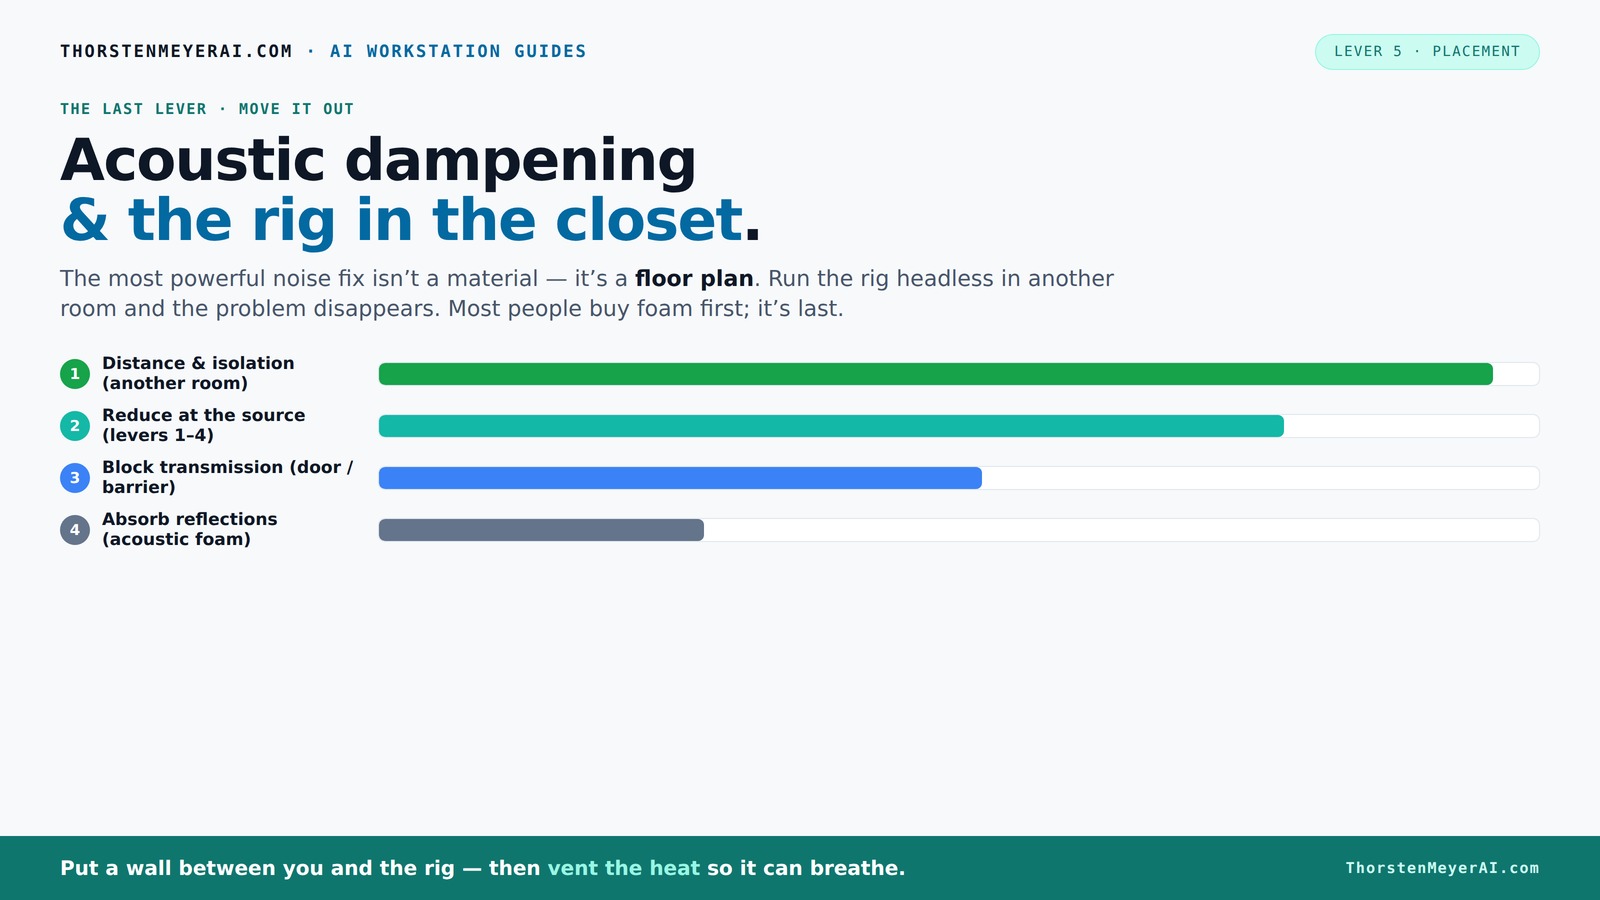
Acoustic dampening
& the rig in the closet.
The most powerful noise fix isn’t a material — it’s a floor plan. A rig you can’t hear because it’s in another room beats any amount of foam. Tap the approaches in Part 1 to see what actually works.
(another room)
(levers 1–4)
(door / barrier)
(acoustic foam)
Contain the noise, not the heat
Key Takeaways
- Moving the rig out of the room is the most effective noise reduction strategy.
- Acoustic foam reduces echo but doesn’t block sound; sealing gaps and barriers are essential for soundproofing.
- Placement of the mic and treatment points matters more than coverage — treat reflection points first.
- Corners trap low frequencies, but sealing gaps and treating ceilings can be equally impactful.
- A combination of DIY treatments and strategic placement can turn even a small closet into a usable recording or inference space.

Focusound 52 Pack Acoustic Foam Panels 1" x 12" x 12" Sound Proof Foam Panles Soundproofing Noise Cancelling Wedge Panels for Home Office Recoding Studio with 300PCS Double-Side Adhesive
Soundproofing - Acoustic foam panels triangular grooves structure for better noise absorption, helps to reduce and absorb unwanted...
As an affiliate, we earn on qualifying purchases.
As an affiliate, we earn on qualifying purchases.
Why Acoustic Dampening Isn’t the Same as Soundproofing — And Why That Matters
Acoustic dampening and soundproofing are often confused, but they serve very different purposes. Dampening materials like foam and blankets absorb sound waves bouncing inside the room, reducing echo and reverb. Soundproofing, on the other hand, stops sound from escaping or entering.
For a closet rig, this means foam can make your voice sound clearer by reducing reflections, but it won’t stop your neighbors from hearing the noise. If you want real silence, you need barriers like sealed doors and dense walls. Think of dampening as making the sound inside your closet deadened, while soundproofing keeps the sound from leaking out.
A real-world example: hanging a blanket on the closet door might make your voice sound better in recordings but won’t keep the noise from leaking into other rooms.

Portable Recording Booth for Home Studio, Foldable Sound Isolation Vocal Shield with Floor Stand, High-Density Acoustic Blanket Enclosure for Singing, Voiceover & Podcast, Includes Phone Holder
INSTANT STUDIO-QUALITY "DRY" SOUND: Transform any noisy room into a professional vocal booth instantly. Engineered with high-density acoustic...
As an affiliate, we earn on qualifying purchases.
As an affiliate, we earn on qualifying purchases.
How to Pick the Perfect Spot Inside Your Closet for Better Sound
Placement is king when it comes to acoustic quality. The best spot? Usually, the middle of the closet, away from walls and corners, which are hotspots for low-frequency buildup. Position your microphone at least a foot from the wall to avoid boxiness, and keep the noise source (your computer or fan) as far as possible from the mic.
Imagine you’re recording a voice. Placing the mic near the closet door or in a corner might boost bass but will also create echoes. Instead, position it in the center of the space, with soft materials behind and around it to absorb reflections.
Think of it like tuning a guitar string: the right placement minimizes unwanted resonance and makes your recordings clearer and warmer.

Audimute Soundproofing Acoustic Door Seal Kit - Door Sweep and Seal - (Large Size)
Includes (2) Door Seals (3/16" x 1/2" x 50') and (1) Door Sweep (1/2" x 1.5" x 25').
As an affiliate, we earn on qualifying purchases.
As an affiliate, we earn on qualifying purchases.
Where to Put Foam, Blankets, and Panels for Maximum Effect
Acoustic dampening in a closet is all about smart placement. The first step: treat the surfaces that cause the most reflections. Usually, that’s the wall behind the mic, the ceiling, and side walls facing the source.
Use foam panels or blankets at reflection points — the spots where sound bounces directly back to the mic. For example, if you’re recording vocals, the wall behind your head and the ceiling above are key spots. Treat reflection points for best results. Covering these areas reduces echoes and makes your voice sound natural, not like it’s in a box.
For low frequencies, focus on corners with bass traps or thicker panels, because low-end buildup is common in small, enclosed spaces.
Pro tip: hang blankets or DIY panels made from thick fabric in front of hard surfaces, and use foam to treat reflection points rather than covering entire walls.
Focusound 52 Pack Acoustic Foam Panels 1" x 12" x 12" Sound Proof Foam Panles Soundproofing Noise Cancelling Wedge Panels for Home Office Recoding Studio with 300PCS Double-Side Adhesive
Soundproofing - Acoustic foam panels triangular grooves structure for better noise absorption, helps to reduce and absorb unwanted...
As an affiliate, we earn on qualifying purchases.
As an affiliate, we earn on qualifying purchases.
Why Corners, Doors, and Ceilings Are the Hidden Keys
Corners are low-frequency magnets, so treating them with bass traps makes a noticeable difference. But don’t overlook the door gaps and ceiling reflections. Sealing gaps and treating ceilings can be just as important. Small cracks around the door let sound leak out and reflections bounce around, creating a muddy, echoey sound.
Seal gaps with weatherstripping or acoustic sealant, and consider adding a door blanket or heavy curtain to block noise leaks.
Ceilings often reflect sound downward, so hanging a thick blanket or acoustic panel overhead reduces harsh echoes. It’s like putting a soft cap on your closet’s head.
In practice, a combination of corner bass traps, sealed gaps, and ceiling treatment creates a dead, controlled environment perfect for recording or quiet AI work.
How Much Coverage Do You Really Need to Notice a Difference?
More isn’t always better — but some coverage makes a big difference. For a closet studio, covering about 30-50% of the available reflective surfaces with foam or blankets is enough to significantly reduce echo and improve clarity. Learn more about home improvement tips.
Start with the reflection points: the wall behind the mic, ceiling, and side walls. Add bass traps in the corners if you hear boomy lows or notice low-frequency buildup. If your space still sounds hollow or muddy, increase coverage gradually.
Real-world scenario: hanging a blanket in front of the closet door and foam panels at reflection points can improve the sound noticeably without breaking the bank.
DIY vs. Professional Treatments — Which Path Is Right for You?
DIY solutions like hanging blankets, using foam panels, and sealing gaps are budget-friendly and surprisingly effective. These are perfect if you’re just starting out or want a quick fix. Just remember: coverage and placement matter more than expensive materials.
For a more professional setup, consider bass traps, sealed soundproof panels, and custom-built booths. These are more costly but deliver better isolation and sound quality, especially if you record vocals or need precise sound control.
Pro tip: combine DIY solutions with strategic placement—like hanging blankets at reflection points and sealing gaps—to get close to professional results without the price tag.
Real-World Tips for a Quiet, Clear Closet Studio
Here’s what works in practice. Hang thick blankets over the door and windows. Use foam panels on reflection points. Place the mic in the center of the closet, away from walls. Seal gaps with weatherstripping. Add a small fan or ventilation duct to move heat out—temperature matters as much as sound.
Remember: the goal isn’t perfection but a clear, controlled sound environment. Even a modest setup can produce studio-quality vocals or quiet inference rigs if you focus on placement, sealing gaps, and targeted dampening.
Example: a YouTuber built a closet booth with a few blankets, DIY foam panels, and a small vent fan. The result? Recordings that sound professional, without the echo or leakage.
Frequently Asked Questions
Does acoustic foam actually soundproof a closet?
No, acoustic foam mainly reduces reflections and echo inside the space. It doesn't block sound from leaking out or coming in. For true soundproofing, you need barriers, sealing gaps, and heavier construction.Where should I place acoustic panels in a closet studio?
Focus on the reflection points: the wall behind your mic, the ceiling above, and side walls facing the sound source. Covering these areas with foam or blankets reduces echo and improves clarity.Do I need bass traps in a small closet?
Yes. Low frequencies tend to build up in small, enclosed spaces. Installing bass traps in the corners helps absorb this low-end energy, resulting in clearer, more balanced recordings.Should I treat the walls, ceiling, or corners first?
Start with reflection points on walls and ceiling, then add bass traps in the corners for low frequencies. Proper sealing of gaps around the door also makes a big difference in noise control.Can a closet really work as a vocal booth for recording?
Absolutely, if you treat it properly. Small closets naturally reduce sound reflections, and with strategic placement, sealing, and some dampening, they can produce professional-quality recordings.Conclusion
In small spaces like closets, the real secret isn’t just stuffing foam everywhere. It’s about thinking smart: move your rig away if possible, seal gaps, and focus your treatments on reflection points and low frequencies. With a little effort, your closet can become a surprisingly quiet, professional-sounding space.
So next time your gear roars louder than your voice, remember: the best fix might be just outside your door or in how you treat the surfaces around you. Your voice, your recordings, and your AI rig all deserve that quiet place.