To connect a water softener to your existing plumbing, start by turning off your main water supply and draining the pipes. Choose a spot near the main line that’s easily accessible, then disconnect the pipe using appropriate tools. Attach fittings or adapters with Teflon tape for a tight seal, connecting the softener’s inlet and outlet properly. Turn on the water, check for leaks, and follow the manufacturer’s instructions to activate the system—more tips will help guarantee a smooth installation process.
Key Takeaways
- Turn off the main water supply and drain existing pipes before starting installation.
- Select an accessible location near the main water line for easy maintenance and refilling.
- Disconnect the main water line and install fittings or adapters compatible with your pipes.
- Connect the softener’s inlet and outlet to the main line, sealing threaded connections with Teflon tape.
- Turn on water, check for leaks, and follow manufacturer instructions to activate the system.
Connecting a water softener to your plumbing system is a straightforward process that can substantially improve your home’s water quality. Before you begin, gather the necessary installation tools, such as pipe wrenches, a hacksaw, Teflon tape, adjustable pliers, and fittings compatible with your softener model. Having everything ready will make the setup smoother and help avoid unnecessary delays.
Start by turning off the main water supply to your home. Drain the existing pipes by opening faucets and valves, ensuring no water remains in the lines. Next, locate the ideal spot for installing the softener—preferably near the main water line and in an easily accessible area for maintenance. Remember, proper placement makes routine maintenance, like refilling salt or cleaning, much easier.
Turn off your main water supply, drain pipes, and choose an accessible softener location near the main line.
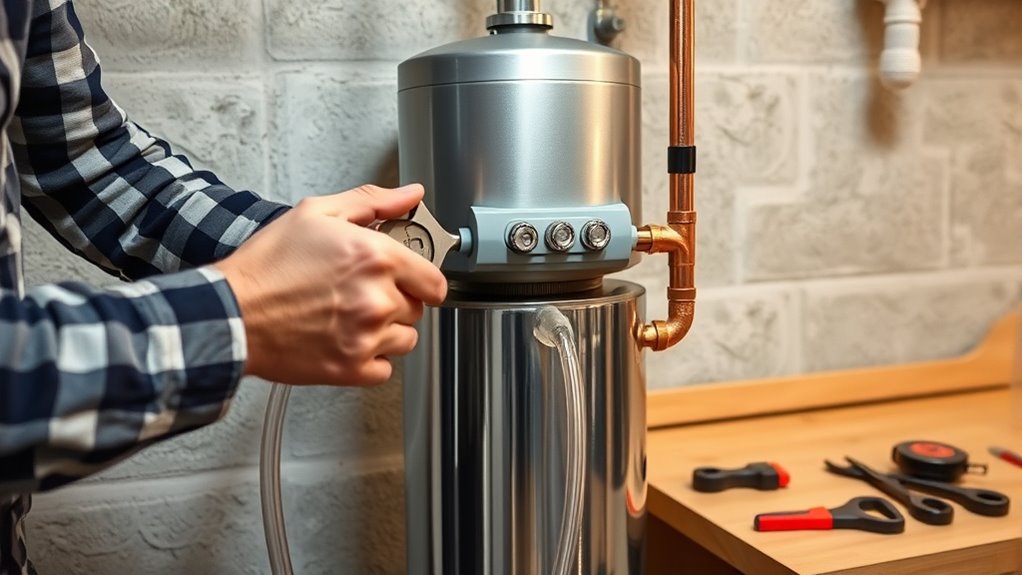
Once you’ve chosen your location, disconnect the main water line using your installation tools. If your existing plumbing is copper or PVC, you might need specific fittings or adapters to connect the softener inlet and outlet ports. Before attaching, wrap Teflon tape around threaded connections to guarantee a watertight seal. Connect the softener’s inlet to the main water line and the outlet to the rest of your plumbing system, making sure all fittings are tight but not over-tightened, which could damage the threads.
After securing all connections, turn the main water supply back on and check for leaks. It’s normal to see some water escaping initially; tighten fittings as needed to eliminate any drips. Once you’re confident there are no leaks, follow the manufacturer’s instructions to initiate the softener’s regeneration cycle, which may involve adding salt to the brine tank.
Regular maintenance tips are essential to keep your water softener functioning properly. Check salt levels periodically—most units need refilling every few months—and clean the brine tank annually to prevent salt bridging or buildup. Also, inspect hoses and fittings regularly for signs of wear or leaks, tightening or replacing parts as necessary. Incorporating wall organization systems can help keep your maintenance supplies organized and accessible, simplifying routine upkeep.
Frequently Asked Questions
Can I Connect a Water Softener Without Professional Help?
Yes, you can attempt a DIY installation of a water softener, but it’s not always recommended. If you’re comfortable with plumbing tasks and have the right tools, you might handle it yourself. However, for complex setups or if you’re unsure, it’s better to seek professional assistance to guarantee proper connection and avoid potential damage. When in doubt, consulting a pro saves time and guarantees a safe, effective installation.
What Tools Are Needed for Connecting a Water Softener?
You’ll need some essential plumbing tools and installation equipment to connect your water softener. Grab a pipe cutter, adjustable wrench, pliers, Teflon tape, and flexible hoses. These tools are vital for a smooth, secure connection. Without them, you might face leaks or fittings that don’t hold. Ready to start? With the right equipment in hand, you’ll confidently connect your water softener, ensuring it works perfectly from the first flow.
How Long Does the Installation Process Typically Take?
The installation process usually takes about 2 to 4 hours, depending on your plumbing system and experience level. You’ll need to allocate enough time for connecting, testing, and troubleshooting. The installation timeline involves some labor requirements, like turning off water supply and securing the unit. If you’re comfortable with plumbing tasks, you might finish faster, but hiring a professional could streamline the process and guarantee everything’s done correctly.
Will Connecting a Water Softener Affect My Water Pressure?
You might notice a slight dip in water flow or pressure drop after connecting your water softener, but it’s usually minimal and manageable. A well-installed system guarantees your water pressure remains comfortable, enhancing your daily routines. If you experience significant changes, adjusting the settings or consulting a professional can help restore ideal water flow. Rest assured, your softener improves water quality without sacrificing your home’s water pressure.
Is It Necessary to Shut off the Main Water Supply During Installation?
Yes, you should shut off the main water shutoff before installation to prevent plumbing disruption. Turning off the main water supply ensures that no water flows while you’re connecting the softener, making the process safer and cleaner. Failing to do so can lead to leaks or water damage. Once you’ve completed the installation, turn the main water shutoff back on slowly to restore water pressure smoothly.
Conclusion
Connecting your water softener to existing plumbing is straightforward if you follow these steps carefully. Think of it like fitting the last piece into a puzzle—you’ll feel accomplished and confident once it’s done. With a little patience and the right tools, you can enjoy softer water and better appliance performance in no time. Remember, taking your time guarantees everything fits perfectly, much like a well-made puzzle piece clicking into place.