
To guarantee your sediment pre-filter works effectively, focus on proper plumbing setup. Regularly regulate water pressure with a pressure regulator to prevent damage or reduced flow. Choose durable pipe materials like PVC or PEX for easy installation and leak prevention. Install the filter aligned with the flow direction and consider always adding a shut-off valve for maintenance. Securing fittings and using correct sealing techniques will help avoid leaks. Keep these considerations in mind for peak performance—more tips await to guide your setup.
Key Takeaways
- Ensure water pressure is regulated with a pressure regulator upstream to prevent damage and maintain optimal filtration.
- Select compatible pipe materials like PVC, copper, or PEX, and use proper fittings to prevent leaks.
- Verify flow direction on the filter and install it accordingly to avoid pressure drops and filtration issues.
- Incorporate shut-off valves before the filter for easy maintenance and to isolate the system during replacement.
- Secure the filter with mounting brackets and check connections regularly to prevent movement, stress, and leaks.
Installing a sediment pre-filter is a critical step in guaranteeing your water filtration system works effectively. Proper installation not only safeguards your equipment but also guarantees you get clean, clear water. As you begin, consider how pressure regulation plays a key role. Your water pressure needs to be within a specific range for the pre-filter to function at its best. Too high, and it can cause leaks or damage; too low, and flow rates suffer, reducing filtration efficiency. To manage this, install a pressure regulator upstream of the filter. This device maintains steady pressure, preventing sudden surges that could compromise the filter or plumbing. Check your home’s water pressure and select a regulator suited to your system’s requirements.
Proper pressure regulation ensures your sediment pre-filter operates efficiently and prevents damage.
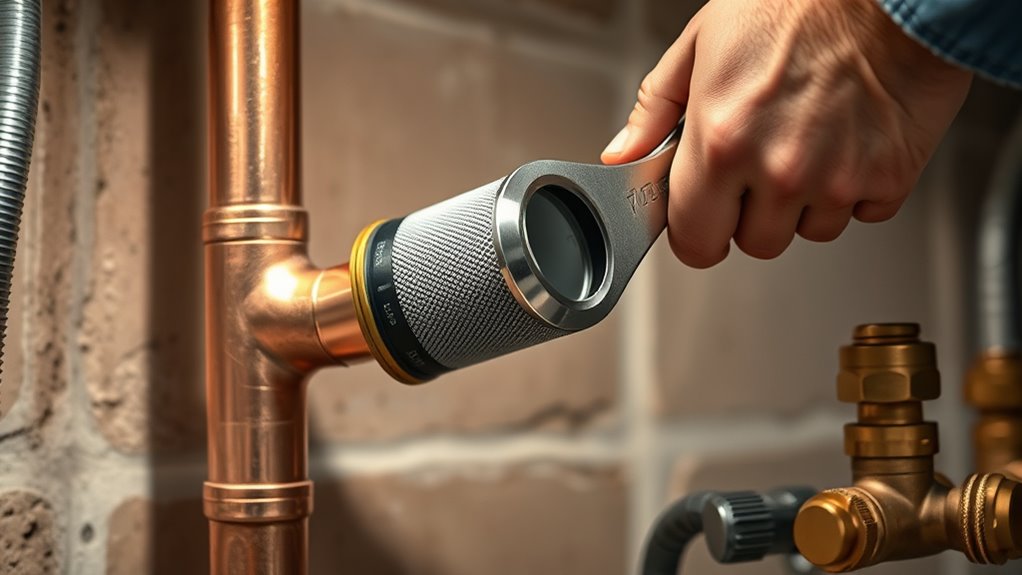
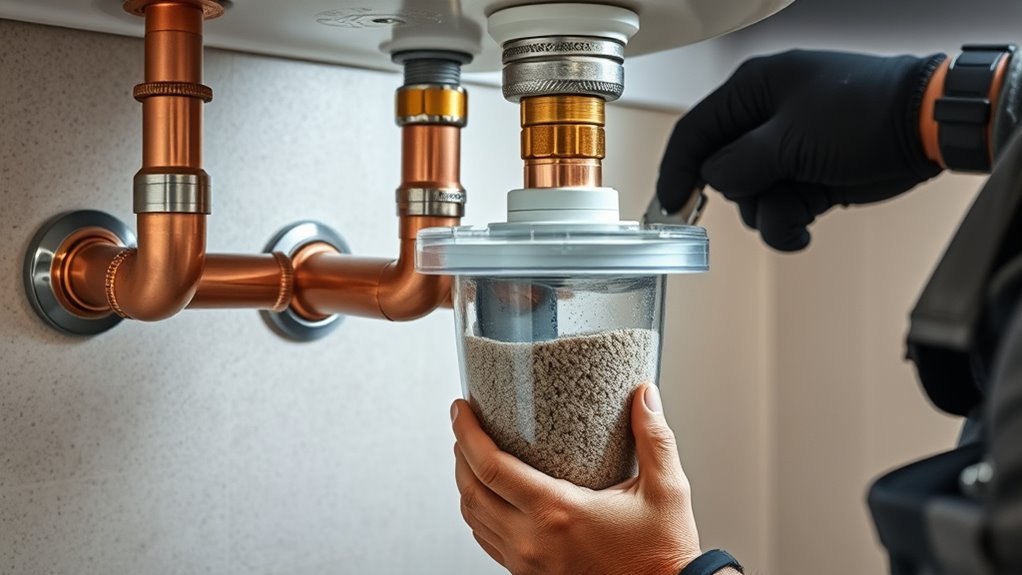
Next, pay close attention to pipe material. The material of your plumbing can influence installation ease and long-term durability. For sediment pre-filters, common options include copper, PVC, and flexible PEX piping. Copper offers strength and longevity but requires proper soldering skills and tools. PVC is lightweight and easy to work with, making it a popular choice for DIY installations. PEX, on the other hand, is flexible, resistant to corrosion, and quick to install with compatible fittings. Whichever pipe material you choose, ensure that the connections are secure and compatible with your filter’s inlet and outlet sizes. Proper fittings and sealing are essential to prevent leaks and maintain system integrity.
When installing the pre-filter, verify the direction of flow indicated on the unit. Installing it backwards can reduce filtration effectiveness or cause pressure drops. Typically, the water flows from the inlet side to the outlet side, so align your pipes accordingly. Use appropriate fittings, and if you’re working with PVC or PEX, use primer and solvent or crimp fittings, respectively, to create secure joints. Avoid forcing connections or over-tightening fittings, which can crack or damage the pipe material. Also, consider installing a shut-off valve before the filter—this allows for easier maintenance or replacement without shutting off the entire water supply.
Finally, ensure that the filter is mounted securely to prevent movement or stress on the connections. Use mounting brackets if necessary, especially in areas prone to vibrations. Regularly inspect the installation points for leaks or pressure issues. Proper plumbing considerations, like managing pressure regulation and choosing the correct pipe material, make a significant difference in your sediment pre-filter’s performance and longevity. Additionally, proper sediment removal can prolong the lifespan of your entire filtration system. By paying attention to these details, you set the foundation for clean, sediment-free water and a reliable filtration system that lasts for years.

Aquasana Pre-Filter, Post-Filter & Assembly Kit Bundle | 20" Sediment Filter | Captures Dirt, Rust & Silt | Drain Valve & Shut-Off Valve | WH-STD-Install | for Whole House Systems
First Line of Defense: The 20" Pre-Filter captures dirt, rust, sediment, and silt before they reach your main…
As an affiliate, we earn on qualifying purchases.
As an affiliate, we earn on qualifying purchases.
Frequently Asked Questions
Can I Install a Sediment Pre-Filter Outdoors?
Yes, you can install a sediment pre-filter outdoors, but you need to take into account outdoor placement and weather considerations. Make sure the filter housing is weatherproof and protected from rain, snow, and extreme temperatures. Use appropriate enclosures or covers to prevent damage from the elements. Regularly check and maintain the filter to ensure it functions properly year-round, regardless of outdoor conditions.
What Tools Are Needed for Installation?
You’ll need basic tools like a pipe wrench, adjustable pliers, Teflon tape, and a drill for installation. Make sure you have the right plumbing connections, such as fittings compatible with your filter’s inlet and outlet sizes. A hacksaw can help cut pipes if needed. Before starting, turn off the water supply and drain lines to prevent leaks. Having these tools ready makes installing your sediment pre-filter smooth and secure.
How Often Should the Pre-Filter Be Replaced?
Think of your sediment pre-filter as a vigilant gatekeeper, tirelessly guarding your water. Typically, its lifespan ranges from 3 to 6 months, but this depends on your water quality and usage. To keep it performing at its best, plan on replacement every 3 to 6 months. Regularly checking the filter guarantees you catch the right moment to swap it out, maintaining clear, clean water and preventing system clogs.
Is It Necessary to Shut off the Main Water Supply?
Yes, you should shut off the main water supply before installing a sediment pre-filter. Turning off the main water shutoff prevents water from flowing during the plumbing connection, reducing mess and potential damage. It guarantees a safe, straightforward installation process. Once the main water shutoff is in place, you can disconnect the existing plumbing connection, install the filter, and then turn the water back on to check for leaks.
Can I Install a Pre-Filter in an Existing Plumbing System?
Yes, you can install a pre-filter in an existing plumbing system. Just make certain the filter is compatible with your plumbing size and type. You’ll need to shut off the main water supply before installation. Regular filter maintenance is essential to keep your system running smoothly and prevent clogs. Check the manufacturer’s instructions for specific guidelines on installation and maintenance to guarantee maximum performance and longevity.

Frizzlife Water Filter Pressure Regulator Protection Valve for Reverse Osmosis & Water Filter System, 60PSI, 1/4” Quick Connect Push Fit, PRV01
Leak-Free Protection: Protects your water filter system, RO system, Coffee Brewers,Ice Makers from high water pressure, no more…
As an affiliate, we earn on qualifying purchases.
As an affiliate, we earn on qualifying purchases.
Conclusion
Remember, a stitch in time saves nine. Properly installing your sediment pre-filter guarantees clean water and prevents costly repairs down the line. Pay attention to plumbing considerations, follow the manufacturer’s instructions, and double-check your connections. By taking these steps now, you’ll save yourself headaches later. Don’t wait until sediment causes problems—act today and enjoy the peace of mind that comes with a well-installed filter. Your plumbing will thank you for it!

Ozmosis 1/4" Male National Pipe Threads X 1/4" Tube Stem Straight Adapter, Acetal Fitting Leak-Resistant, Compatible with Various Systems
PRODUCT LIABILITY: The fundamental role of this productis to create a dependable and secure connection between 1/4-inch outer…
As an affiliate, we earn on qualifying purchases.
As an affiliate, we earn on qualifying purchases.

EZRODI 3 Pack Push-to-Connect Plastic Shut Off Valve Fitting (1/4-in OD x 1/4-in OD, Inline Straight Ball Valve), White+Blue
(1)DURABLE MATERIAL- 1/4 inch tubing shut off valve is manufactured from white POM(polypropylene ) and equipped with food…
As an affiliate, we earn on qualifying purchases.
As an affiliate, we earn on qualifying purchases.